![]()
With event-led bundled packages, the activity needs to have an allocation.
This topic explains how to create a new activities contract.
Activities are entrance fees and day tours, such as museum tickets, bicycle tours, and theater performances.
Activities contracts are negotiated between travel companies (both tour operators and travel agencies), and activity suppliers or tour operators. Once the contract is negotiated you can enter the terms into the system, and sell/request the activity in the Reservations System.
Activity contracts can be used to sell activities as a stand-alone service, or added to dynamic packages, escorted tours, static packages, or event-led bundled packages.
|
With event-led bundled packages, the activity needs to have an allocation. |
When building the contract, you will add a price list which can include multiple markets, seasons, price levels, and components. You can define separate price lists for packages and groups.
|
If you are building a contract for an activity for a group, it is important that you update the calculation sheet formulas first. |
Activities can be sold on Request, as OK by default, or OK based on allocations (which are defined in the contract).
Supplier Accounts: Service provider, supplier paid and reserving supplier.
Destination: The activities destination
Category: The activities category, such as museum, or half-day. The category is used to divide the search results into groups, and can be used to filter stand-alone activity search results.
Service attribute: The service attribute is used for grouping activities together under sub-services.
Add-on transfer: Transfer contracts which can be attached to the activity contract. The add-on transfer picks up the passengers and brings them to the activity.
HTML or PDF description file: A file that can contain a description of the activity which customers can view from the Activity Details page by clicking the More Details link, or from the travel file by clicking on the link in the transaction name.
Pictures: Thumbnail images, which are displayed in the Reservations System, in the search results and in the Activity Details page. The image size should be 390 pixels wide by 260 pixels high. The file type should be *jpg or *jpeg.
Market: Markets are used to define different rates for separate groups of travel agents or customers. For example, the travel company can offer the activity supplier a high volume of customers from Poland. These customers receive a 15% reduced rate on standard price levels from the supplier. In the price list you will create two markets with two separate price levels: All and Poland. The Poland market will receive a 15% reduced rate on per person components, which is not offered to the rest of the customers who belong to the All market. You can define the markets in advance, or create them when creating the contract.
Season: The validity of the contract. You can create the season in advance, or create it when creating the contract.
Price level: The different activity types, such as full day, half day, day admission, or evening admission.
Price components: The individual components that comprise the price of the activity ticket, such as Per Person, Per Adult, or Per Child. Supplement price components can be 1st child, 2nd child, or Guest.
Go to Products - Contracts.
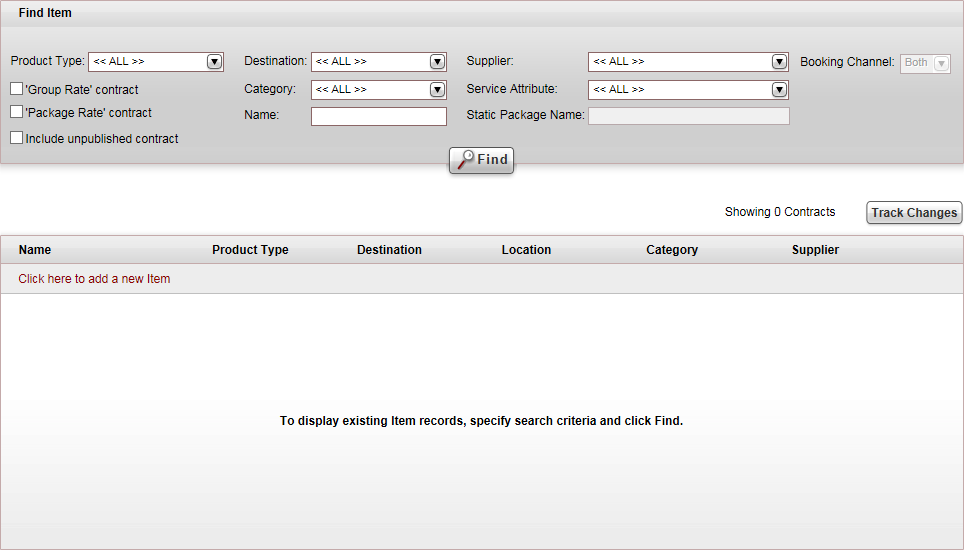
Click Click here to add a new item, and select New Activities.
A new item page opens in the Activities tab.
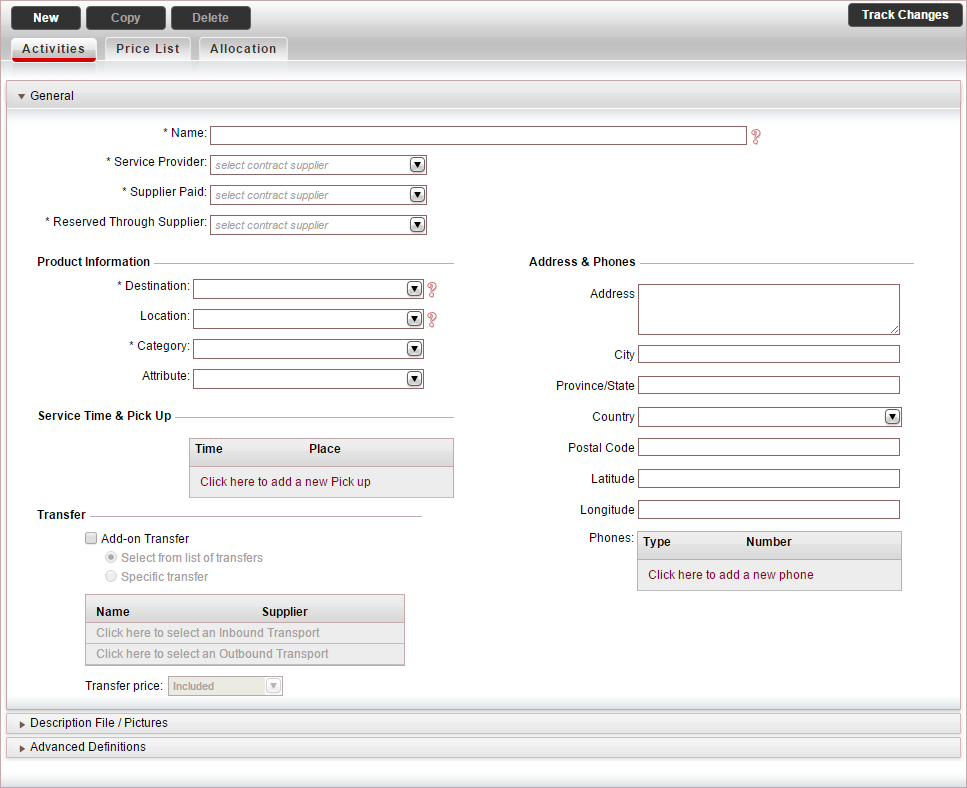
In the General expander:
Mandatory. In the Name field, enter the name of the contract.
Mandatory. In the Service Provider field, select the supplier account of the service provider from the drop-down list.
Mandatory. In the Supplier Paid field, select the supplier account of the supplier paid for the service from the drop-down list.
Mandatory. In the Reserved Through Supplier field, select the supplier account of the reserving supplier from the drop-down list.
In the Product Information section:
Mandatory. In the Destination field, select the activity destination.
|
The Location field is not relevant for activity contracts. |
Mandatory: In the Category field, select the activity category.
In the Attribute field, select the activity attribute.
If the activity has service times and locations from which a transfer picks up passengers, in the Service Time & Pick Up table:
Click Click here to add a new Pick up.
Enter the pick-up time and place.
Repeat this step for each pick-up point and time.
|
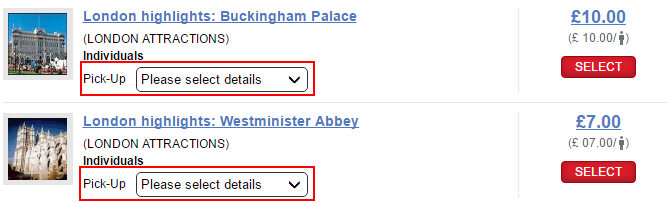
This table can also be used for defining the opening hours or service times of the activity. This information appears in the Reservations System, in the search results page, in the Pick-up field.
|
If the activity has an add-on transfer (otherwise skip to the next step), in the Transfer section:
To add an add-on transfer to the contract, select Add-on transfer.
Choose one of the following options:
Select from list of transfers: During the reservation process, the customer is prompted to select a transfer from all available transfers.
Specific transfer: Select specific transfer contracts to attach to the activity contract:
To add an inbound transfer, click Click here to select an Inbound Transport.
The Add Transport dialog box appears.
![]()
Enter the relevant search parameters for the transfer, and click Find.
Parameter |
Description |
| Destination | Mandatory. The destination of the transfer contract. |
Name |
The contract name |
Supplier |
The supplier of the transfer contract |
Category |
The category of the transfer contract |
Price Level |
The price level of the transfer contract |
Transfer contracts matching the search criteria are displayed in the results section.
![]()
To add a transfer to the contract, click Add.
To add an outbound transfer, click Click here to add an Outbound transfer, and repeat steps ii-iii.
In the Transfer price field, select whether the cost of the transfer is Included in the activity selling price or is Added on to the activity selling price.
Select the Description File / Pictures expander. It is possible to upload Price List Descriptions in different languages. This way, you can define different files in different languages, so that the product will be displayed in the user language in the Reservation System.
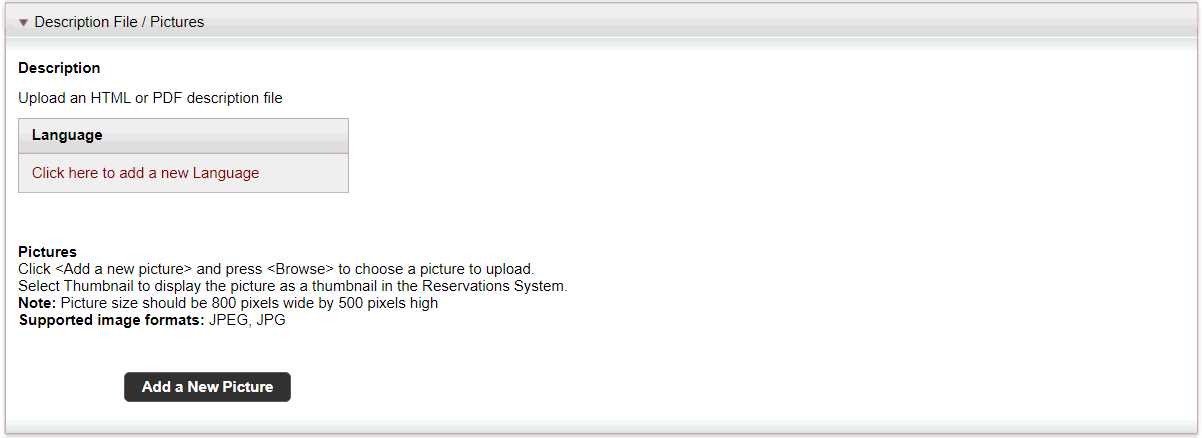
To upload an HTML or PDF description file, that can be viewed in the Reservations System, in the Activity Details page, in the Description section:
|
In the travel file, in the travel file header, if you click the Print button, and select Send Documents, you can send the description file as an attachment in an e-mail message. |
Click Upload.
The Upload File dialog box is displayed.
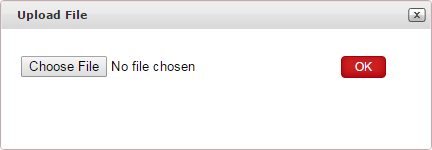
Click Choose File, and select the HTML or PDF file to upload.
Click OK.
To upload thumbnail images which are displayed in the Reservations System, in the search results, and the Activity Details page, in the Pictures section:
Click Add a New Picture.
A radio button appears in which you can upload the image.
Click Choose File, and select the image you want to upload, and click Upload.
In the Title field, enter the image title.
Repeat steps i-iv for each image you want to upload.
Select the image to display as the thumbnail image in the search results.
The rest of the images are displayed in the Activity Details page.
Select the Advanced Definitions expander.
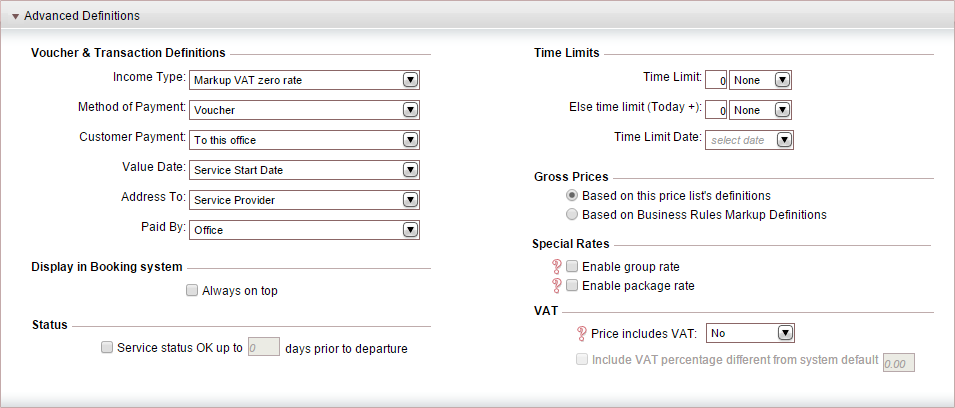
In the Voucher and Transaction Definitions section, the fields are initialized according to the definitions in the Supplier Paid's supplier account. However, you can edit these fields if necessary. Editing the fields in the contract does not affect the definitions in the supplier's account.
In the Display in Booking System section, to display the hotel first, regardless of the sorting method in the Reservations System, select Always on top.
In the Status section, if you want the activity to always be displayed as available, select Service status OK up to X days prior to departure, and enter the number of days prior to the service start date in which the service will revert to being displayed on request.
You should only select this option, if you know that the transaction is going to be definitely confirmed when you contact the supplier. Otherwise, users who book this service are going to assume it is confirmed even though in reality it is on request.
|
The Time Limits section is not relevant for activity contracts. |
In the Gross Prices section, select how to calculate the selling price:
Based on this price list's definitions: Both the net and selling price are taken from the price list during the query process.
Based on the Business Rules Markup Definitions: The net price is taken from the price list, and the business rules are added to it to create the selling price.
If you have special rates for groups or packages, in the Special Rates section, select which special rates to enable.
In the VAT section:
|
This section is only relevant if you are working according to the Sales and Purchases accounting method. |
If the activity price includes VAT, in the Price Includes VAT field, select Yes.
If the VAT percentage is different from the system default, in the Include VAT percentage different from system default field, enter the correct VAT percentage.
Select the Special Request expander.
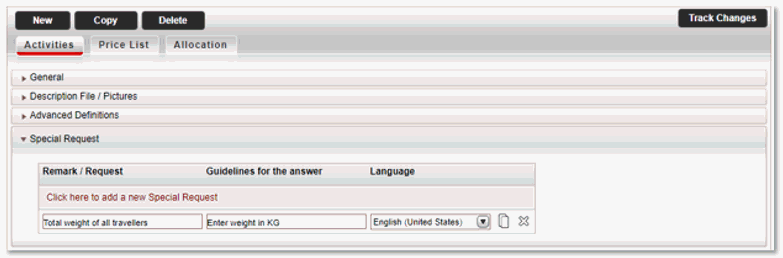
In the Remark/Request field, enter the special remark or request. In the Guidelines for the answer field, enter a reply guidance. In the Language field, choose the language of the special request from the drop down list.
These remarks will be displayed during the booking process, under the Special Requests section of the Passenger Details page together with input fields for the answers. The answers will be saved in the transaction and will be displayed in the reservation and voucher.