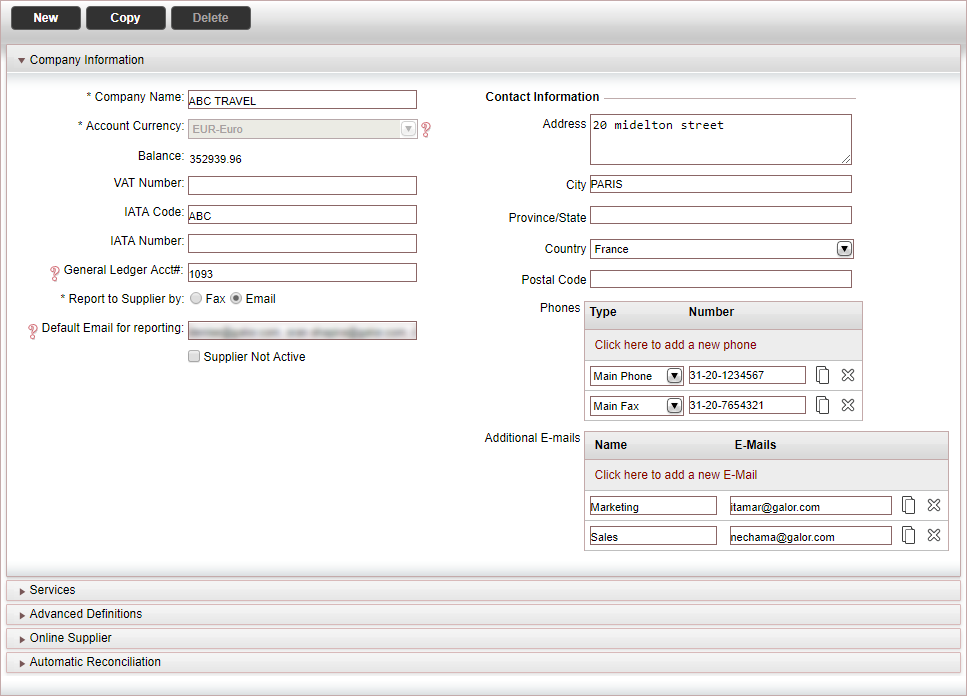
Search for the supplier account you want to edit.
Click the Edit
icon ![]() in the row of the supplier you
want to edit.
in the row of the supplier you
want to edit.
The supplier account is displayed.

Click Click here to add a new Service.
The Service Definitions page appears.
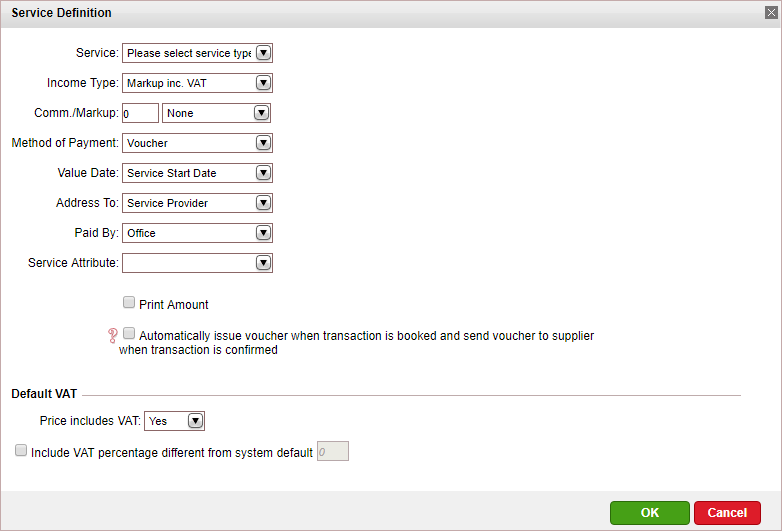
In the Service field, select the service type sold by the supplier from the drop-down list.
In the Income Type field, select the supplier's income type from the drop-down list.
In the Comm./Markup fields - according to the Income Type you selected - enter the default commission/markup types to define the supplier's default commission or markup:
Percent: The commission or markup are a percentage of the product's net price.
Amount: The commission or markup is an absolute amount, which is applied differently according to where you enter the price in the manual transaction. If you enter the price in the Passengers & Pricing tab, the amount is multiplied by the number of passengers and nights/days (if applicable). If you enter the price in the Accounting tab, the amount is applied once.

The default commission and markup is only applied to manual transactions.
In manual transaction, the default markup defined in the supplier account is overruled by the markup defined in the business rules.
In the Method of Payment field, from the drop-down list, select one of the following methods to pay the supplier for the service:
Method of Payment |
Description |
Voucher |
A voucher is issued to the supplier as a commitment to pay upon the receipt of an invoice. Payment is remitted in the supplier reconciliation process. |
Cash |
The supplier is paid in cash for the transaction in the Reservation System via a payment requisition document. |
Self ticketing |
For Self Operation Flights and Insurance suppliers. A ticket is issued to the supplier as commitment to pay for the flight or insurance. If you select this option, the following settings will need to be configured by your project manager (which only they can view):
For Insurance only:
Note, it is only possible to send XML reports if a reporting interface has been developed with the insurance company. For more information contact your project manager. |
In the Value Date field - when the method of payment is voucher - select the date that determines when the voucher needs to be paid to the supplier:
Value Date |
Description |
Issue Date |
The date when the voucher is issued |
Travel File Start Date |
The date when the earliest service in the travel file begins |
Service Start Date |
The date when the service provided by the supplier begins |
Service End Date |
The date when the service provided by the supplier ends |
In the Address To field define who the voucher is addressed to: Service provider or Supplier Paid.
In the Paid By field, select the entity that pays the service provider for the voucher:
Entity |
Description |
Client |
The client who orders the transaction |
Supplier paid |
The supplier who is paid for the service |
Office |
Your company |
Define in Remark |
For the Hotelbeds content interface. The paid by field, remains empty, and the voucher indicates the local Hotelbeds office responsible for the reservation. |
In the Service Attribute field, select the service attribute.
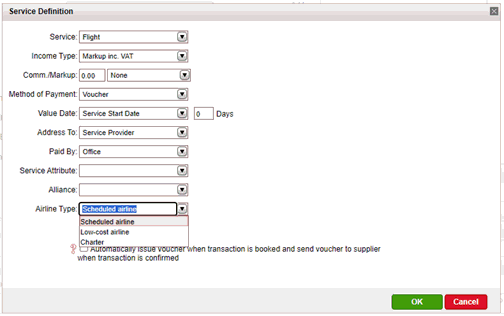
Flights only. In the Alliance field, select the alliance to which the flight supplier belongs to.
Flights only. In the
Airline Type field, select whether
the airline is a Scheduled airline,
Low-cost airline, or a Charter. Note
that if the office does not use Self-operation Flights and/or Mark-Up
rules, this selection is not relevant.
Select the Print Amount check box to print the net price of the product on the voucher.
If you want vouchers to be automatically issued when transactions are created for services provided by the supplier and sent to the supplier's e-mail address when the transactions are confirmed, select Automatically issue voucher when transaction is booked and send voucher to supplier when transaction is confirmed.
|
This option overrides all other options and circumstances in the system which prevent vouchers from being issued automatically with the following exceptions:
|
In the Default VAT section, enter the VAT information:
|
This section only appears if in the database definitions VAT on travel services is selected. |
In the Price includes VAT field, select whether the supplier price includes VAT.
If the VAT percentage is different from the system default, select the Include VAT percentage different from system default, and enter the VAT percentage that needs to be applied to the supplier price.
Click OK.
Repeat steps 4-15 for additional services provided by the supplier.
Click Save and exit.
Or,
Continue to edit the supplier's bank details.