This topic explains how to create a new insurance contract.
Insurance contracts are usually used by travel companies (both travel
agencies and tour operators) who have contracts with insurance providers.
Each insurance contract is a separate policy.
Profit from insurance contracts is derived from the commissions provided
by the insurance providers for each policy sold.
Separate contracts need to be created for each policy you want to upload
to the Reservations System. If you have a single policy with multiple
plans, you will want to create a single contract, in which each plan is
a separate price level.
Description file:
This is the description information you want to display in the Reservations
System (usually the insurance policy).
Picture file: This is a thumbnail image that
is displayed in the Reservations System, in the search results (usually
the insurance company logo). The picture size should be 390 pixels
wide and 260 pixels long.
Destination:
This is the region in which the insurance policy is valid. You can
have a single Worldwide destination,
or create separate regions for the different areas where the policy
applies. The destination should be created in advance, but if necessary
you can also create it when creating the contract.
Category:
The insurance category. Their are two types of insurance categories:
individual policies and annual policies. The category of the individual
policy can be the policy name, such as blue,
gold or silver.
The category of an annual policy is Annual
or Annual multi trip.
Season:
The validity of the contract. You usually only need one season as
insurance prices tend to remain fixed, and change slowly. The season
should be created in advance, but if necessary you can also create
it when creating the contract.
Price levels:
The type of policy. Usually, there is only one price level - regular.
The price levels should be created in advance, but if necessary you
can also create them when creating the contract.
Price components: The price components are the different
components that make up the price of the insurance policy, the main
insurance price component (per person)
and additional supplements. Some supplement price components you can
include by default in the contract, such as baggage. Other price components
can be purchased by the customer, such as winter sports, extreme sports
or laptop. The supplements need to be defined as Partial
Period, which allows users
and passengers to apply the supplement only to part of the transaction
period, instead of the entire period. For example, with a two week
trip to Italy, that includes a long weekend at a ski resort, you will
need regular insurance for the entire trip, and the Winter Sports
supplement for the ski resort period.
All
the price components should be created in advance (in Setup
- Product Definitions - Price Components), but if necessary,
you can create them when creating the contract.
Go to Products
- Contracts.
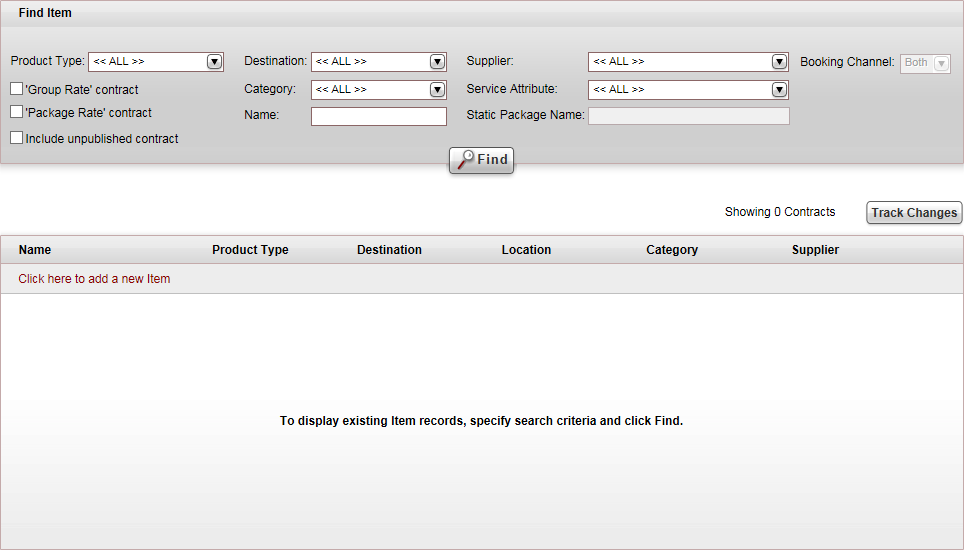
Click Click here
to add a new item, and select New
Insurance.
A new item page opens in
the Insurance tab.
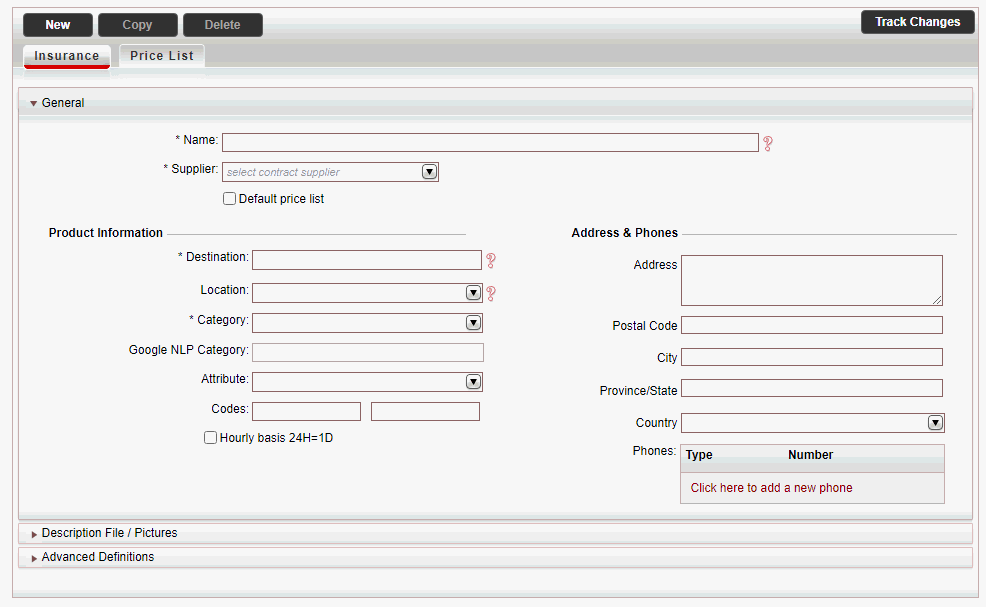
In the General
expander:
Mandatory:
In the Name field, enter
the product name, for example All
in one.
Mandatory:
In the Supplier field,
select the insurance supplier from the drop-down list.
In the Product
Information section:
Mandatory:
In the Destination field,
select the insurance destination
from the drop-down list, or create a new destination.
Mandatory:
In the Category field,
select the category
associated with the insurance contract, for example Blue,
Gold, or Silver.

|
It is recommended to include the category name in
the name of the product to provide more emphasis in the
Reservations System.

|
In the Attribute
field, select the service attribute
associated with the insurance contract.
If relevant, in the Codes
field, enter insurance codes that are sent to the insurance supplier
when the policy is reserved through the Reservations System.
|
The Location,
Attribute, and
Address & Phones
fields are not relevant for insurance suppliers. |
For car insurance, if relevant, check
the Hourly basis 24H=1D flag. When this option is selected,
the rental period calculation will be based on 24 hours for each
day, meaning that a rental day is calculated from the rental hour
(for example, starting Monday 10am). When this option is not selected,
the insurance will continue to be calculated according to a full
day logic, starting at 00:00 and ending at 23:59. Part of a day
is calculated as a full day in both cases.
In
the Address & Phones section,
enter the address of the insurance provider. Otherwise leave these
fields empty.
Select the
Description File / Pictures expander. It
is possible to upload Price List Descriptions in different languages.
This way, you can define different files in different languages, so
that the product will be displayed in the user language in the Reservation
System.
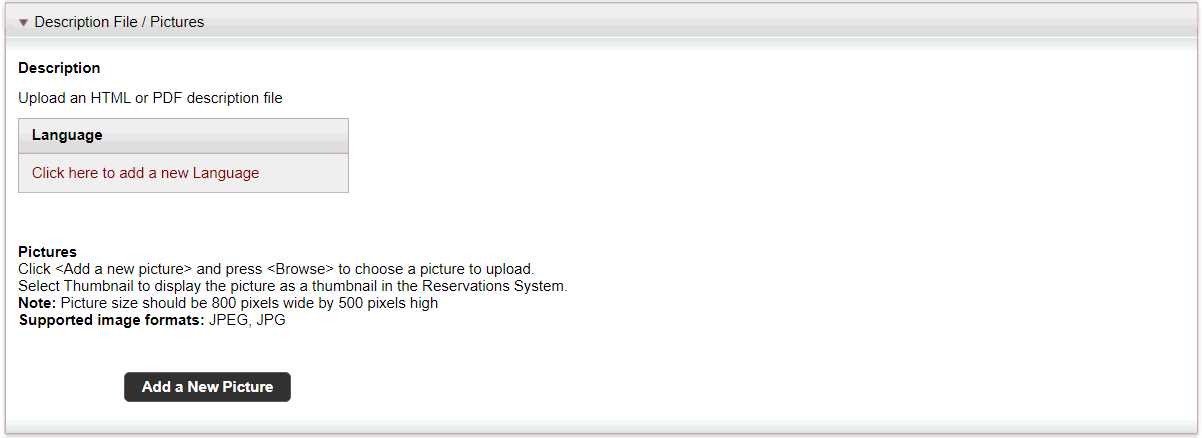
In the Description
section, to upload an HTML or PDF insurance policy that can be viewed
from the Insurance Details
page:
|
In the travel file, in the travel file
header, if you click the Print
button, and select Send
Documents, you can send the description
file as an attachment in an e-mail message. |
Click Upload.
The Upload File dialog
box is displayed.
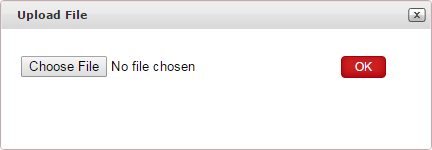
Click Choose
File, and select the HTML or PDF file to upload.
Click OK.
To upload a thumbnail image to be displayed in
the Reservations System, in the search results, in the Pictures
section, click Upload, and
browse for the file to attach.
Select the Advanced
Definitions expander.
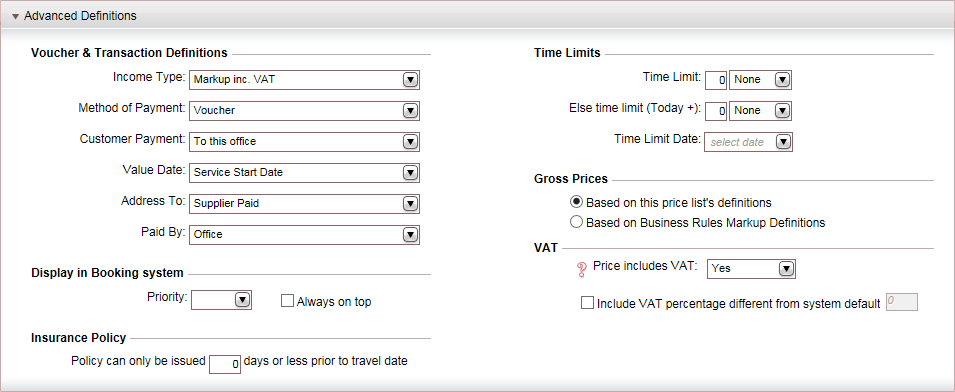
In the Voucher
and Transaction Definitions section, the fields are initialized
according to the definitions in the insurance supplier's
account. However, you can edit these fields if necessary. Editing
the fields in the contract does not affect the definitions in the
supplier's account.
|
The Time
Limits, Display in
Booking System, and Gross
Prices sections are not relevant for insurance contracts. |
In the Insurance
Policy section, enter the minimum number of days prior to the
travel date in which the policy can be issued.
In the VAT section:
If the insurance selling price includes VAT,
in the Price Includes VAT
field, select Yes.
If the VAT percentage is different from the
system default, in the Include
VAT percentage different from system default field, enter
the correct VAT percentage.
|
This section is only relevant if you
are working according to the Sales
and Purchases accounting method. |
Click Save,
and continue to create
the Price List for the insurance contract.