This topic explains how to create and edit price lists for insurance
contracts.
1 Market: Markets are used
to define different rates for separate groups of travel agents.corporate
clients or customers. With insurance contracts, the selling price
is the same for all markets.
1 season: The date range
in which the price is valid. The insurance selling price usually tends
not to change so you are only going to need one season, which can
be valid for a 10 year period.
Price levels: The price
levels are the different plans in the policy that you want to display
in the Reservations System. If the policy only has one plan, you need
to create a single price level. If the policy has multiple plans,
you need to create a separate price level for each plan.
Price components:
Their are three types of price components
Main: The main
price component - usually per
person.
Default supplements:
These supplements are included by default in the insurance policy,
such as Baggage, Air Rescue
Optional supplements:
These supplements can be purchased separately by the customer
when the policy is purchased in the Reservations System, such
as Laptop, Ski.
The pricing of the price components can be built around either markup
or commission, depending on your agreement with the insurance supplier.
With insurance contracts, individual policies are priced per person
per day, and annual policies are priced per person.
For each market, season and price level, you can define custom remarks
which can be displayed on the voucher, Booking
Details page, reservation, itinerary, during the booking process,
or Only to B2E users. You can define that the remarks only be displayed
in Reservations Systems in a specific language.

|
By default, the contract is going to be
displayed in the Reservations System. While working on the contract
it is recommended in the price list tree to deactivate the price
list. In the Price List Definition
pane, select Change Status,
and change the status to Unpublish.
Once the contract is complete, change
the status to Publish. |
|
As contracts are renewed, and price lists
are updated as a result, you can view changes through the Track
Changes button, which allows you to generate a report of recent
changes.
This is useful for when you need to know when
the contract was last updated, what was updated, and by whom.
If you want to view the price list for expired
seasons, you can click the Show
History button to display seasons that have
already passed. |
|
You can define add remarks to the insurance
contract. If you select that the remarks should appear in the
Reservations System search results as Special
Remarks only the first 150 characters are displayed, the
rest of the remark can be viewed as a tooltip when moving the
mouse over the remark. To display the full text of the remark,
in the Insurance website definitions for the relevant configuration,
select Display full insurance
remarks from internal contract. |
Select the Price
List tab.
The price list is displayed with the default market All
selected.
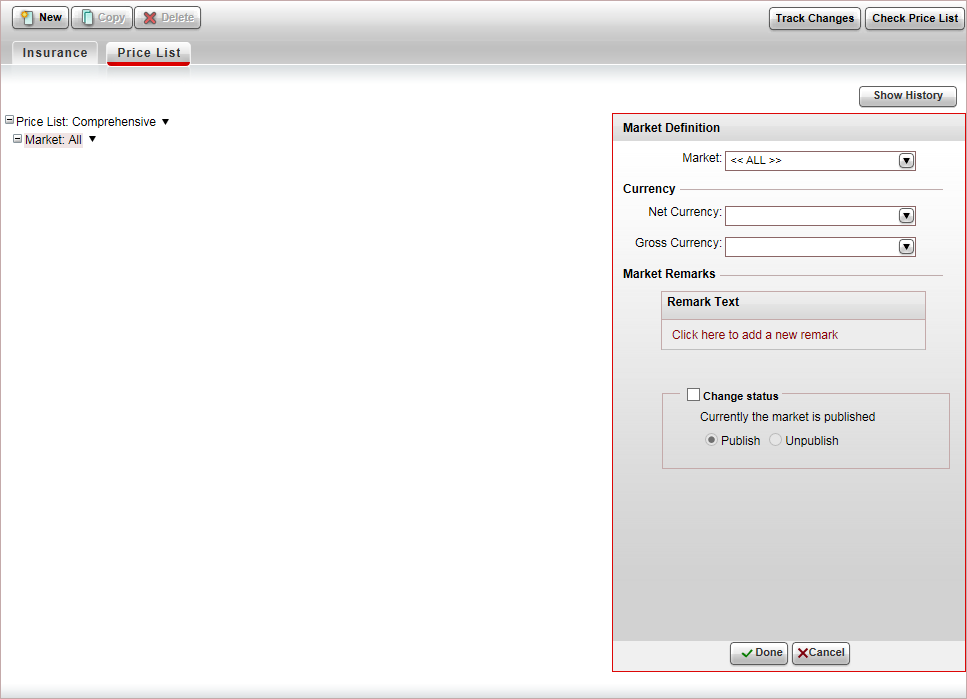
In the Market Definition pane, in the Currency section, select the Net currency (Supplier currency)
and Gross currency (selling
currency) of the insurance service, and click Done.
The net and gross selling currency codes are updated on the price
list tree.
In the price list tree, right-click on the market,
and select New Season.
A new season is added to the price list.
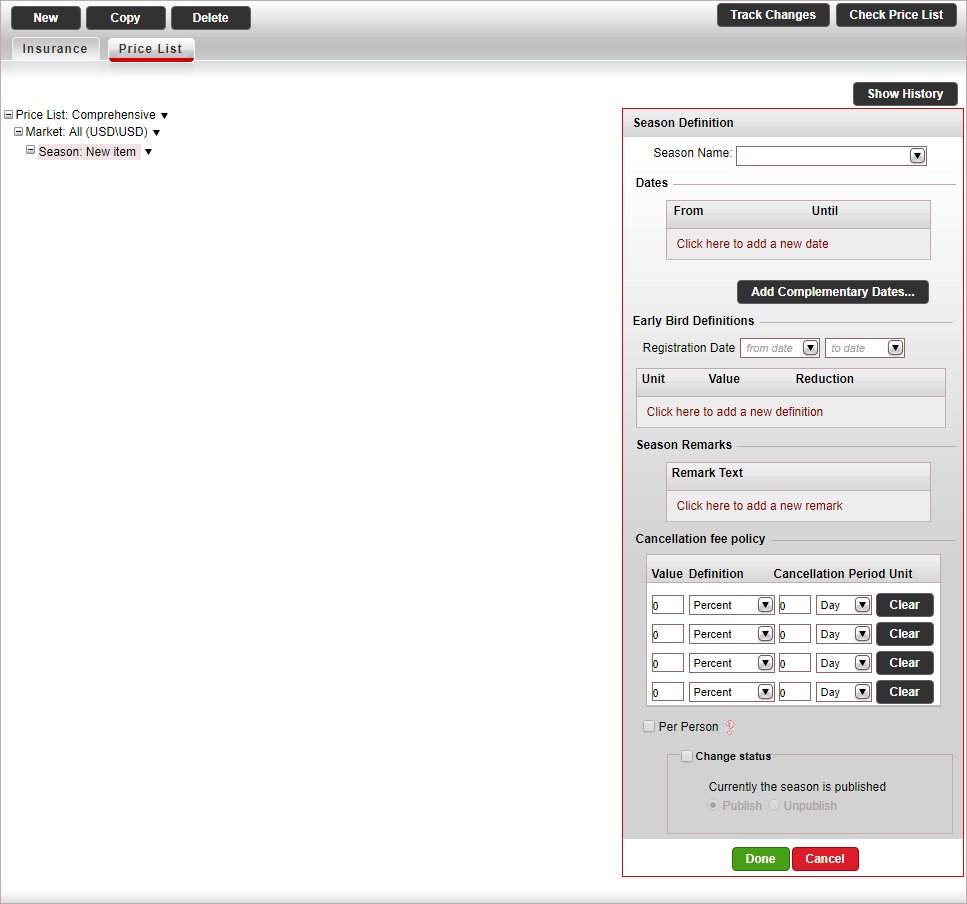
In the Season Definition pane, in the Dates section enter the season dates,
and click Done.
A season name is automatically generated by the system based on
the dates you enter.
The season information is automatically updated on the price list
tree.
In the price list tree, right-click on the season
and select New Price Level.
A new price level is added to the price list. The price level includes
the main and supplement price components that are defined in the default
insurance contract.
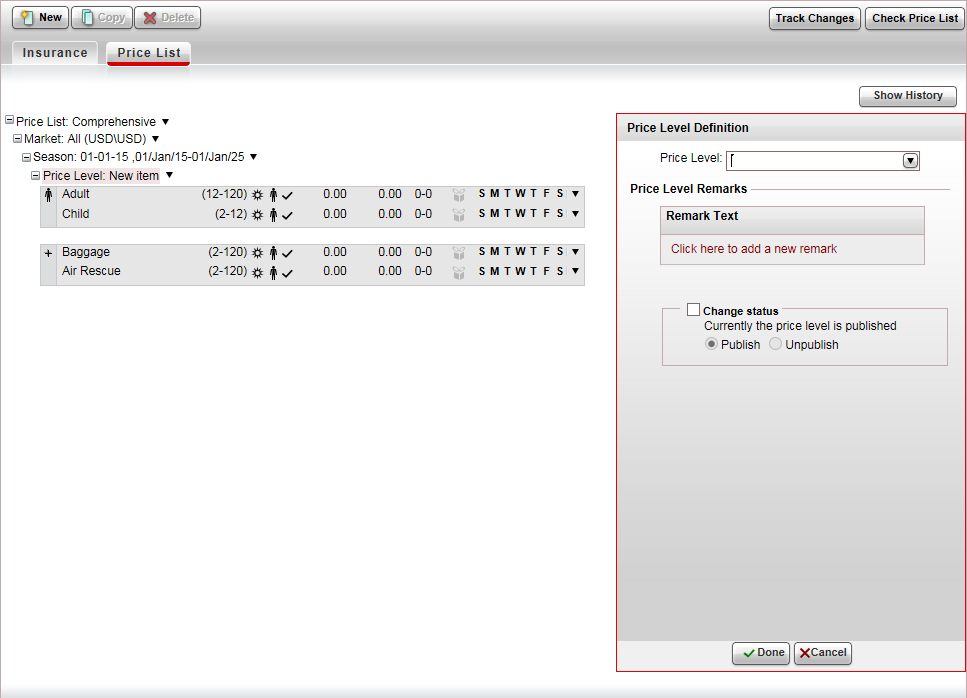
In
the Price Level Definition
pane, in the Price Level field,
select a price level you defined for the insurance contract, and click
Done.
|
If you did not create a price level
in advance, you can create a new price level, by clicking
<Add New Price Level...> |
The price level information is automatically updated on the price
list tree.
In
the price-list tree, select a main price component.
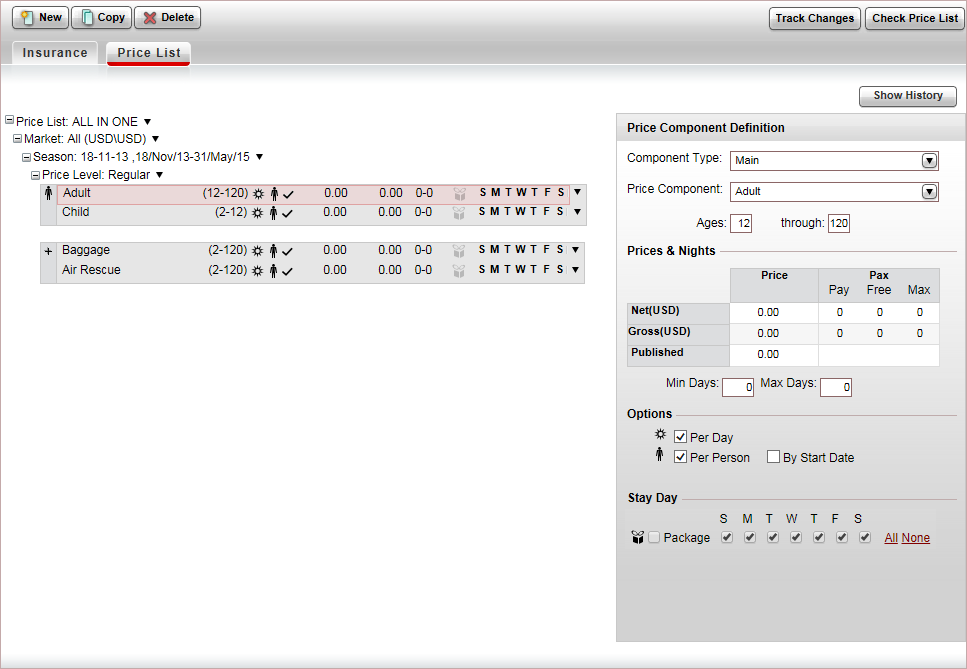
If you want to change the price component,
in the Price Component Definition
pane, in the Price Component
Field, select the price component.
|
If you did not create a price component
in advance, you can create a new price component, by clicking
<Add New Price Component...> |
If you want to change the price component
ages in this contract,
in the Ages field, enter
the ages to which this price component applies.
|
Any changes made to the price component,
only apply to the contract, and do not affect the default
settings saved in the system. |
In the Prices
& Nights table, enter the relevant prices per day:
Net:
The supplier price of the insurance price component
Gross: The selling price of the insurance
price component
The Published amount
is updated automatically.
If you received separate prices from the insurance
supplier for longer insurance policies, in the Min
Days and Max Days
field, enter the duration for which this price is relevant.
Click Done.
If you have an additional main price component
in the price list tree, select the main price component, and edit
it according to the previous step. Otherwise, delete this price component.
If you have additional main price components you
need to add to the price list, for each main price component, right-click
on the main price component,
select Copy & Paste Price Component,
and repeat step 7.
In the price list tree, select or create a supplement
price component.
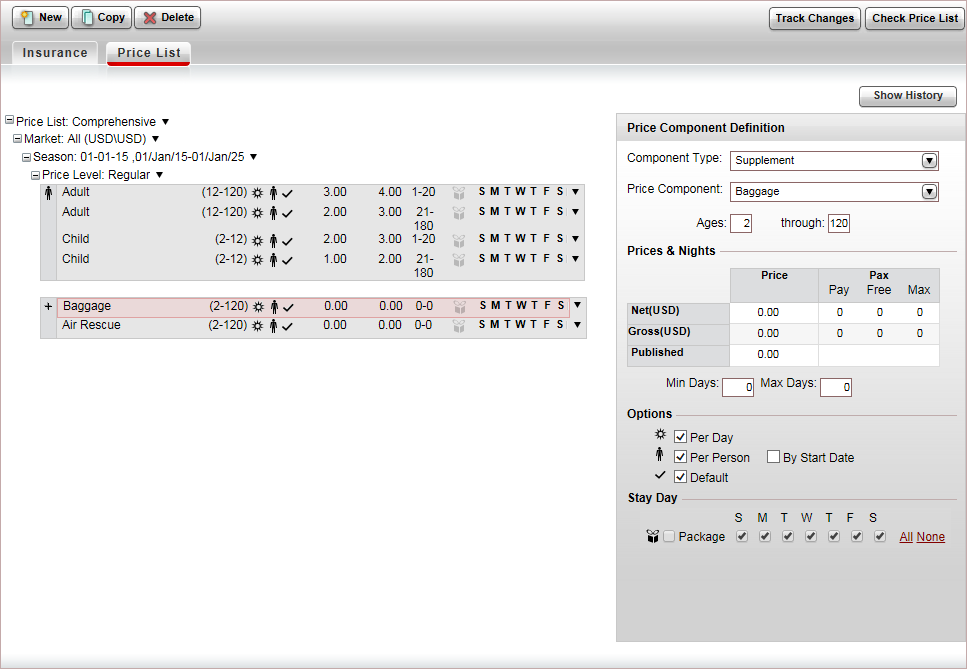
If you want to change the price component,
in the Price Component Definition
pane, in the Price Component
Field, select the price component.
In the Prices
& Nights table, enter the relevant prices per day:
Net:
The supplier price of the insurance price component
Gross: The selling price of the insurance
price component
The Published amount
is updated automatically.
If
the supplement is optional and needs to be purchased separately
by the customer, clear the Default
option.
Click Done.
If you have an additional supplement price component,
select the supplement price component, and edit it according
to the previous step. Otherwise, delete this price component.
If you have additional supplement price components
you need to add to the price list, for each main price component,
right-click on the supplement
price component, select Copy &
Paste Price Component, and repeat step 10.
To add additional price levels, in the price list
tree, right-click on the price level and select Copy
& Paste Price Level.
The following message appears.

If you want to reset the prices to 0 in the new
price level click Yes. If
you want to keep the old prices, click No.
For each price level, you want to add repeat step
8-13.
To check the price list, click Check
Price List, and correct any mistakes that appear in the dialog
box.
Click Save &
Exit.

 Click here for a detailed example.