The Passengers section contains information on the passengers in the travel file.
The section can be collapsed to allow you to view the total number of rooms and passengers (section header) or expanded to display each individual passenger in the travel file (section table).
Each row in the section table represents a single passenger who has a title, name, age, and phone number (if entered into the system).
The following information can be entered in the Passengers section:
Field/Button |
Description |
|
Section Header |
||
Passengers |
The section title along with the total number of rooms and passengers in this section. |
|
 / / |
This button is displayed if there are services that are reserved for some, but not all of the passengers, and is used for filtering the displayed services according to selected passengers. Select the relevant passengers, and click this button to filter the services in the Services section to display only the services reserved for the selected passengers. To undo the filter, click this button again. |
|
| Add Passenger | Click this button to add another passenger to the travel file. |
|
Financial Join |
Select the passengers, and then click this button to join the passengers together for financial purposes. |
|
Join/Unjoin |
Select the passengers, and then click this button to join the passengers in a room |
|
Open/Close Details |
Click this link to expand or collapse the Passengers section table. |
|
Sort by: Rooming list/Financial list |
Select whether the section table should display a passenger Rooming List or passenger Financial List. |
|
Section Table |
||
Rooming List |
||
|
The arrows indicate how passengers are joined in rooms.
If an infant is attached to an adult as part of a room-join, the infant will be reported alongside this adult in the Passenger Flight List report, even if they have different surnames. |
|
Passenger name |
The passenger’s name and title The passenger's name and title will be red if the passenger's passport is going to expire within six months from the travel file start date. Clicking on the passenger name opens the Passenger Details page for that passenger. |
|
Age |
The passenger’s age |
|
Phone |
The passenger’s phone number (if the information exists). If multiple phone numbers are entered for a passenger, the phone number that is displayed in the Passengers section is determined according to the following order:
|
|
The passenger's e-mail address |
||
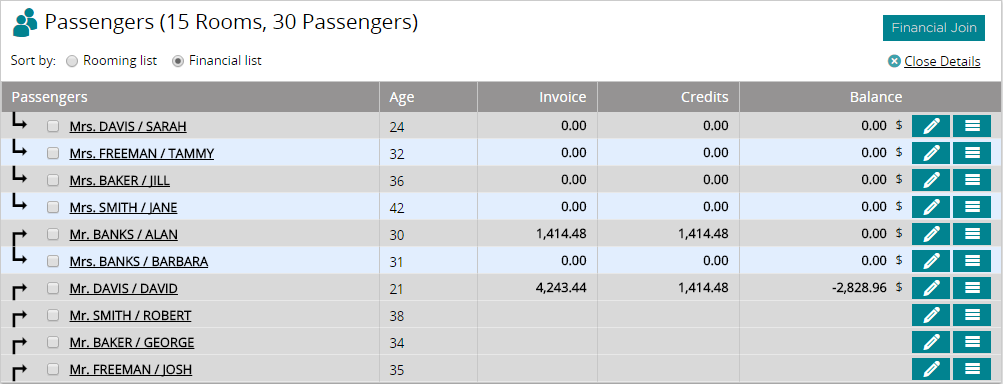
Financial List |
||
The financial join is indicated by the alternating stripes in the section table (and not the room join arrows). Example 1:
In the example above, Mr. Alan Banks and Mrs. Barbara Banks are joined together in the same room, but are joined separately financially. Example 2:
If you have passengers who are joined financially but share a room with different passengers, in the Financial List view, the room join arrows will be broken. In the example above, Mr David Davis, Mr. Robert Smith, Mr. George Baker, and Mr. Josh Freeman are joined financially because they share the same stripe in the table. Their rooming list arrow is broken though because they are sharing a room with a different passenger who is not part of the financial join. |
||
|
The room join arrows are the same as the rooming list view. Except when passengers are joined financially but share a room with different passengers. In this case, in the Financial List view, the room join arrows are broken. |
|
Passenger name |
The passenger’s name and title The passenger's name and title will be red if the passenger's passport is going to expire within six months from the travel file start date. Clicking on the passenger name opens the Passenger Details page for that passenger. |
|
Age |
The passenger’s age |
|
| Inv: | The total amounts of invoices issued for any of the passengers who are financially joined. Invoices that credit the travel file are not included. The amounts are in the travel file currency. |
|
| Credits: | The total amounts of all documents that credit any of the passengers who are financially joined. Credit notes, agent commission invoices and invoices that credit the travel file are not included. The amounts are in the travel file currency. This amount includes receipts issued to paying customers who are not passengers. If the receipts is issued for the entire travel file, it credits the first passenger in the travel file. If the receipt was issued for a specific passenger, it credits that passenger. |
|
| Balance: | The difference between the Credits and Inv: columns. The amounts are in the travel file currency. |
|
|
||
Edit button ( ) ) |
Click this button to enter the Passenger Details page, where you can edit the passenger’s account in Travel booster. |
|
Actions button ( ) )
|
Cancel |
Select this option to cancel the passenger in the travel file. The passenger cannot be added to reserved services, and will not appear on any travel documents issued. |
Change Name |
Select this option change the passenger’s name. |
|
Edit Remark |
Select this option to open a dialog box in which you can add remarks that saved on the passenger. In the dialog shown, it is possible to manually enter remarks in the top field or to select a remark from a predefined list in the bottom field. The remark code selected will be shown in the upper field. The free text and/or codes entered into the field are limited to 15 characters . |
|
Invoice |
Select this option to issue an invoice for the passenger. This is used when you need to issue separate invoices to each passenger, such as when an activity is reserved by some passengers, but not all of them. Selecting this option opens the Invoice Definitions page where you can edit the invoice details, such as which services to include, and what information to display. |
|
Get Credit Card Token |
Credit2000 and CreditGuard Only. Select this option to get the passenger's credit card token from Credit2000 and save it in the passenger's account. The token is used to identify the passenger's saved credit card information in the interface. When getting the token you will need to enter the passenger's full name, ID, credit card number, expiration date, and CVV. After you send this information to the interface, Credit2000 will return a token, which is saved in the passenger's account, and can be viewed in the Passenger Details page. When issuing the receipt for the customer, you can select the token instead of manually entering the passenger's credit card information. To enable this option, in the Administration Tools, in Setup - Database Definitions - Miscellaneous, the option Enable Storage of credit card details in database needs to be selected. |
|
Get C. C. Approval Number |
CreditGuard Only. Select this option to request an approval number from CreditGuard which will be used for reserving credit on the passenger's credit card for future transactions. The approval number is valid for three days. You can request multiple approval numbers from CreditGuard. The exchange rate will be saved when reserving the credit. Before requesting an approval number, you need to request a credit card token first. To enable this option, in the Administration Tools, in Setup - Database Definitions - Miscellaneous, the option Enable Storage of credit card details in database needs to be selected. |
|
View C. C. Approval Numbers |
CreditGuard Only. Select this option to view the approval numbers returned from CreditGuard. To enable this option, in the Administration Tools, in Setup - Database Definitions - Miscellaneous, the option Enable Storage of credit card details in database needs to be selected. |
|
TRC by Approval Number |
CreditGuard Only. Select this option to debit a passenger's credit card using an approval number returned from CreditGuard. After the card is debited a TRC is issued for the passenger. The card is debited using the exchange rate saved when the credit card approval number was requested. To enable this option, in the Administration Tools, in Setup - Database Definitions - Miscellaneous, the option Enable Storage of credit card details in database needs to be selected. |
|
Receipt |
Select this option to issue a receipt for the passenger. Only users with the appropriate permits can issue receipts in the travel file. There are separate permits for each payment method. in a travel file associated with a specific travel agent/corporate client, if you issue a receipt for an individual passenger, the receipt will be issued as if it were for a direct sale. Any travel agent/corporate client specific Credit Card Usage transaction fees and installment fee terms will not be applied. |
|
Repay |
Select this option to issue a refund for the passenger. Only users with the appropriate permits can issue refunds to customers in the travel file. |
|
Issue Itinerary |
Select this option to issue an itinerary for the customer. Only services reserved for the customer are included in the itinerary. |
|
Delete Passenger |
Select this option to delete the passenger. You cannot delete the passenger if he is joined with other passengers, or if there are services reserved for that passenger. |
|
Confirmation Form |
Select this option to open a dialog box in which you can send a confirmation form e-mail to the passenger and link it to a B2C configuration. The confirmation form contains a link to aB2C travel file with the trip details and the confirmation form at the bottom. After the passengers read the confirmation form they need to accept the terms and conditions. Once the passengers accept the terms and conditions, another e-mail is sent to the passenger containing a PDF print-screen of the travel file, which includes partial terms and conditions, and this action is saved in the travel file log. To make the full terms and conditions viewable in this e-mail, in the database definitions you can add a link to the full terms and conditions document which is saved on your site. The confirmation form is uploaded in Setup - Database Definitions - Documents - Confirmation Form. |
|
| Account Summary | Select this option to open the Account
Summary dialog box.
The Account Summary dialog box displays the following information for all of the passengers who are financially joined:
All amounts are in the travel file currency. |
|

 Passengers are joined in two single rooms.
 Passengers are joined in a double room
 Passengers are joined in a double with one extra bed. An additional
arrow is added for each extra bed added.
Passengers are joined in a double with one extra bed. An additional
arrow is added for each extra bed added. Passengers are joined in a twin with two extra beds