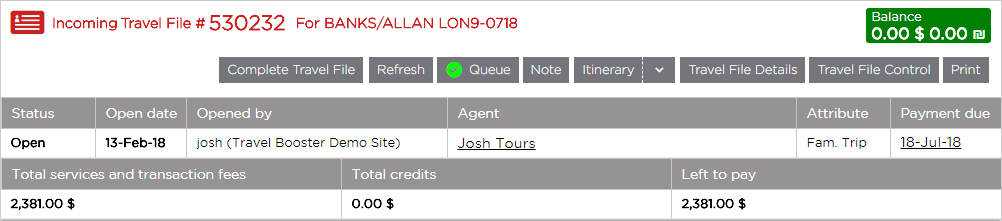
The travel file header includes information and buttons that relate to the entire travel file, such as the travel file reference number, status, and balance.
The following information is included in the travel file header.
Field/Button |
Description |
||
Section Header |
|||
Travel file type |
The type of travel file: Incoming, individual, group, etc. |
||
Travel file number |
The travel file reference number which is automatically generated by the system. |
||
Travel file name |
The name of the travel file, which is by default the name of the first passenger in the travel file. The Travel File name can be edited in the General Information page. |
||
Balance |
The travel file balance in the travel file currency and it's equivalent in the system currency. If both currencies are the same, the amounts are displayed once. If in Setup - Database Definitions - Travel Files, you select Hide equivalent system currency balance, the equivalent amount in the system currency is hidden. |
||
To mark the travel file as Completed, click this button. A completed travel file is a travel file in which all activity has been finished and it is waiting to be closed. After clicking this button, the button changes to Continue Work. Clicking Continue Work marks the travel file as uncompleted. The action of marking a travel file as Completed or Uncompleted is registered in the travel file log. Marking a travel file as Completed affects two areas in the Reservations System:
To display the Completed button in the travel file, in Setup - Database Definitions - Travel Files, select Display Completed Travel File button. |
|||
Refresh |
Refreshes the travel file page even if information has changed in the database, saving the need to exit and reenter the travel file. This button is enabled in Setup - Database Definitions - Travel Files, and needs to be activated by your project manager. |
||
Queue |
If there is a ✔ next to the button, the travel file is attached to a queue. Clicking on the button opens the Travel File Queues dialog box in which you can append the travel file to queues or remove it from queues. In the bottom half of the dialog box, there is a log listing all the actions relating queues. The log can be filtered according to date user, and type of action performed (Append to Queue or Removed from Queue) |
||
Note |
Click this button to create or view a note. A note is used for internal purposes by the user assigned to the booking. The note appears as a pop-up whenever someone opens the booking. | ||
Itinerary |
Itinerary |
Click this button to generate an itinerary. The itinerary lists each and every service ordered by the customer – all relevant dates and details, and does not include prices. |
|
Itinerary Definitions |
Select this option to open the Itinerary Definitions page. In this page you can choose which services to include in the itinerary. |
||
Send to TripIt |
Select this option to send the Itinerary to TripIt |
||
Travel file details |
Click this button to generate the Travel File Details. The Travel File Details lists all the services in the travel file including prices, taxes and transaction fees, and can be used for quotes. With travel agents/corporate clients, the commission/reduction is displayed without VAT.
Click on the Language drop-down list at the bottom of the Travel File Details page to define the language of the page. |
||
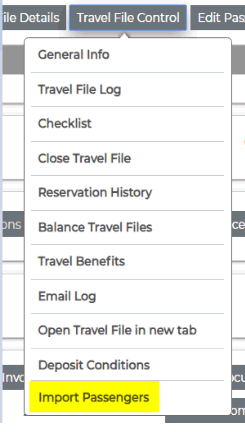
Travel File Control |
General Info
|
Select this option to open the General Information page on the travel file where you can edit the general information related to the travel file. |
|
Travel file log |
Select this option to open the travel file log where you can view all the actions that were performed in the travel file. |
||
Checklist |
Select this option to view the checklist of actions that need to be performed on the travel file. |
||
Close Travel File |
Select this option to start the process for closing a travel file. |
||
Reservation History |
Select this option to view the reservation history in the travel file. |
||
| View Services Rates | Contact your project manager. | ||
| Balance Travel File | When working with Self-Operation Tours, it is possible to connect a Group travel file to each tour where all expenses and incomes of the tour are managed. Select this option to issue a debit/credit note and transfer the balance from the individual travel file to the group file. |
||
| Travel Benefits | Select this option the available travel benefits which can be offered to customers. | ||
| Email Log | Select this option to view a log of all e-mail messages sent
from the travel file. The following e-mail messages are displayed in the log:
In the log, clicking on the subject of the e-mail message displays the e-mail message that was sent. |
||
| Link to group travel file | Select this option to link the travel file to a group travel file. |
||
| UDID Management | Select this option to open the UDID Management dialog box. The UDID Management dialog box contains all the travel file UDIDs and the passenger UDIDs. If the fields contain any information they are printed on the invoice. |
||
Deposit Conditions |
Select this option to add deposits and change final payment due date. |
||
Import Passengers* |
When you receive a name list as CSV file (such as Excel), it can now be easily uploaded here. It can also be used to import your database of customers into the system (without a travel file). More details below* |
||
View Destination Information |
Select this option to view information on the travel file destination. |
||
Itinerary |
Click this button to print the travel file itinerary |
||
Hotel List |
Click this button to print the list of hotels reserved in the travel file |
||
Passenger's List |
Click this button to print the list of passengers in the travel file |
||
Rooming List |
Click this button to print the passenger rooming list in the travel file. You will be redirected to the Rooming List Definitions page, where you can select the following options:
|
||
Mail to Client |
Click this button to e-mail the travel file to the customer. |
||
EOB Mail to Client |
Click this button to e-mail an end of booking travel file to the customer. End of booking travel files are mostly used by B2E users who manage travel files created in the B2C selling channel, and need to e-mail the B2C customer to confirm changes made to the travel file. The EOB e-mail is in XSL format and linked to the B2C travel file. |
||
Proposal Mail to Client |
This option only appears in Proposal Travel Files and Open Travel Files with at least one proposal-based transaction. Click this button to generate a proposal from an Open travel file as long as it contains proposal-based transactions. |
||
Proforma Invoice |
Issue Proforma Invoice |
Click this button to issue a proforma invoice for the travel file. This option is only displayed if no other documents have been issued in the travel file. A proforma invoice is a preliminary invoice with a quotation of services and their amounts. The proforma invoice does not affect the travel file balance. |
|
View Proforma Invoice |
Click this button to view a list of proforma invoices issued in the travel file. |
||
Send Documents |
Click this button to open a dialog box from which you can send by e-mail:
|
||
Section Table |
|||
Status |
|||
Open Date |
|||
Opened by |
|||
Agent/C. Client |
|||
Agent/C. Client Clerk |
|||
Attribute |
|||
Payment Due On |
|||
Total credits |
|||
Left to pay |
|||
Profit |
Profit = Supplier commission + markup + transaction fees - travel agent commissions/corporate client reductions - general travel file reductions. Profit is updated each time financial documents are issued in the travel file. The profit does not include VAT. |
||
When using the Print option, you have the option of printing a hard copy, printing a PDF file, sending the page by e-mail to a client, or sending the page to Microsoft Outlook. |
|
The Total services and transaction fees, Total credits and Left to pay columns are only displayed if the option Display total section is selected in the Database Definitions. |