Go to Financial - Supplier Reconciliation.

Enter the search parameters.
Field |
Description |
Supplier |
Select the supplier account. |
Currency |
Select the currency in which the documents were issued |
Branch |
Select the branch where the document was issued. You can only select the branches you have the user permit to view. |
Issue Date Until |
Enter the date range in which a financial document is issued |
Value Date Until |
Enter the date range in which a financial document is valued |
Default. Select this radio button to display vouchers and refunds that are not yet reconciled |
|
Select this radio button to display payment requisitions and debit notes that are not covered by a remittance and credit notes and tax invoices that need to be covered by a receipt. |
|
Documents Covered By |
Select this radio button to search for a specific payment requisition, receipt, transfer receipt or remittance, and select the document type and enter the document number. |
All documents |
Select this radio button to search for all financial documents. |
Selected only |
Select this option to search for financial documents that were previously selected and then saved (using the Save Selection button) |
Include tickets |
Select this option if the supplier has tickets, and you want to include them in the data displayed in your search results. By default this option is not selected, which means that the system does not search for tickets, effectively shortening the duration of the search. |
Select Pending for final payment.
Click Find.
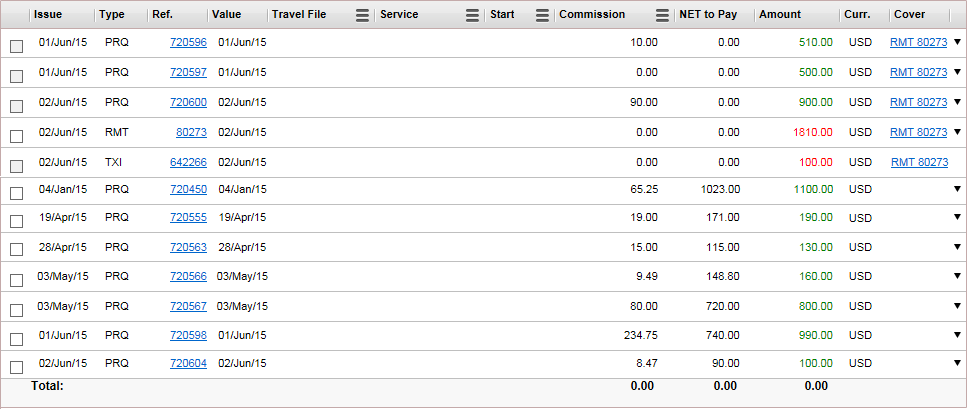
The financial documents are displayed in the results section with the data you requested.
The results section contains the following columns:
Column |
Description |
Issue |
The issue date - the date on which the document was issued |
Type |
The document type: VCH for vouchers, PRQ for payment requisitions, RMT for remittances, REF for refunds, TXI for tax invoices, RCT for receipts, C/D for credit notes and D/C for debit notes. |
Ref |
The document reference number |
Value |
The value date - the date the document needs to be paid |
Travel File/Branch/Reservation/Supp Invoice/Income Type/Ticket Number. |
In this column you can select one of six options to
display, by clicking on the icon with the three bars (
|
Service Name/Passenger Name/Leading Carrier |
In this column you can select one of three options to
display, by clicking on the icon with the three bars (
|
Start/End |
In this column you can select one of two options to
display, by clicking on the icon with the three bars (
|
Commission/Published/Tax/ |
In this column you can select one of six options to
display, by clicking on the icon with the three bars (
|
Net to pay |
The net amount that needs to be paid to the supplier including airport/port taxes (taken from the Net to Remit field in the transaction. |
Amount |
The total amount on the document, including airport/port taxes and commissions (taken from the Total to Supplier field in the transaction) |
Curr. |
The currency on the document |
Cover |
The covering document. For example, a payment requisition (PRQ) covers a voucher (VCH), and is covered by a remittance (RMT). |
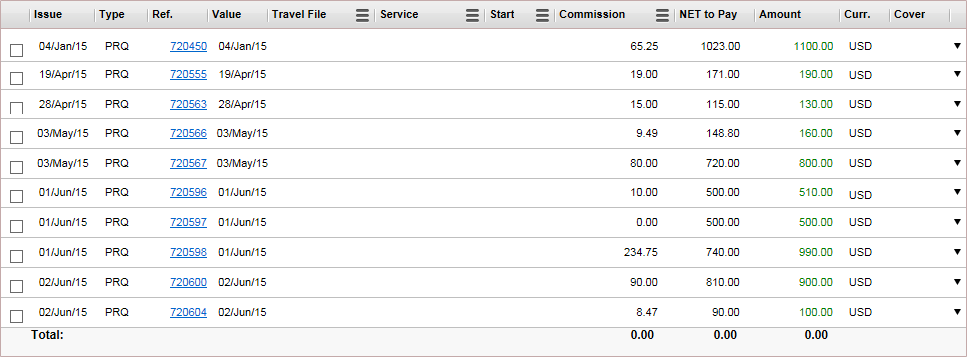
Select the payment requisitions you want to issue a remittance for.
If the payment requisitions are filtered according to a specific branch, the remittance is going to be attached to that branch, and not the branch of the user issuing the document. |
Click Remittance.
The Remittance Advice Definition page is displayed.
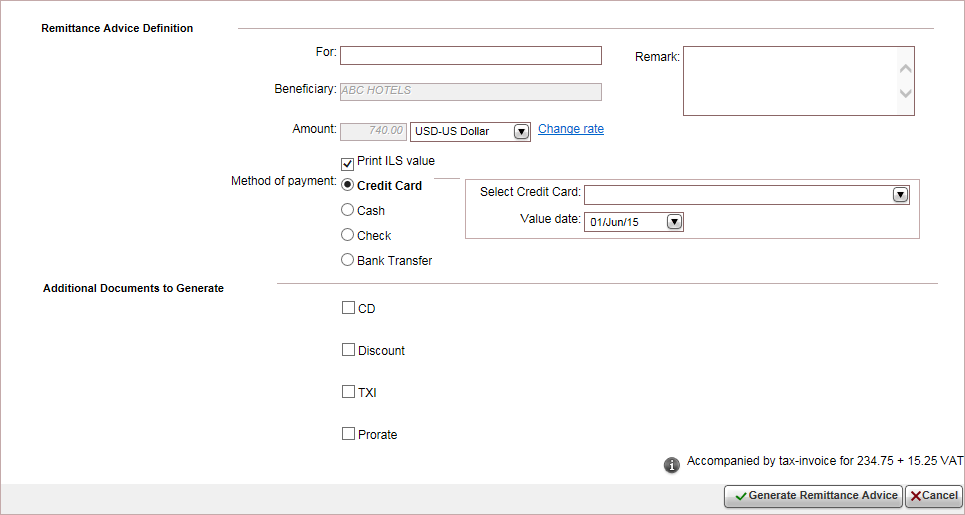
In the For field, enter free text to be displayed on the remittance, for example Sales April 2015
|
Note that the Beneficiary field is initialized with the name of the account to whom the remittance will be issued. |
In the Amount field, select the payment currency from the drop-down list. The remittance amount is initialized from the vouchers and refunds you selected and cannot be edited.
|
If the remittance is issued in currency other than your system currency, select the Print<[System Currency> value to also print the system currency value on the remittance. |
If relevant, if you received an amount in a different currency that when converted does not equal the amount on the documents you selected, change the currency rate.
This action is dependent on the relevant user permit.

 Click here for more information.
If required, in the Remark field, enter a remark to be displayed on the remittance.
In the Payment Method field, select one of the following forms of payment:
Credit Card: You are redirected to a payment gateway where you need to enter the credit card details.
Cash: In the Details field, enter free text associated with the payment.
Check: You can pay in installments using checks, and a receipt can be issued for multiple checks. Each row in the table represents a single check.
In the Bank field, enter the name of the bank that appears on the check.
In the Branch field, enter the branch number that appears on the check.
In the Account field, enter the account number that appears on the check.
In the Check number field, enter the check number that appears on the check.
In the Amount field, enter the amount of the check.
In the Value date field, select the date that appears on the check.
To add a new check, click Click here to add a new item.
A new row appears where you can enter the check details.
To copy a check, in the row of the check you want to copy, click the Copy icon

A new row appears with the same details as the previous check, the check number and month are advanced by one.
To delete a check, click the Delete icon
 .
.
Bank Transfer:
In the Bank field, select the bank account from which the transfer is going to be made.
In the Reference field, enter the reference number of the transfer.
In the Value date field, select the date of the transfer.
|
A transfer receipt issued through a payment gateway cannot be cancelled. If there is a relevant Credit Card Usage transaction fee rule, the amount of the fee is added to the amount on which the receipt is issued. The value date, for transfer receipts issued for credit card payments is end of the month (EOM) +2. For example, if the issue date is July 20, the value date is August 2. |
Each check is displayed as a separate row in the receipt, and in the cashier module.
The Receiving Bank, Branch, Account, IBAN and Swift fields are initialized from the account. Review this information and change as necessary.
If you select bank transfer, the remittance will be issued as a Payment Order. Payment order is an international banking term that refers to a directive to a bank or other financial institution from a bank account holder instructing the bank to make a payment or series of payments to a third party. |
In the Additional documents to generate section, select additional documents to generate with the remittance:
CD: Enter the amount to credit the supplier, and select the General account to be debited
Discount: Enter the discount amount or percentage, and select the discount account which will be debited.
TXI: In the For field, enter who or what the tax invoice (TXI) is being issued for, and enter the amount or percentage, and the income account the TXI is going to be attached to. By default this field contains Sales for <supplier name>.

This is a separate document from the TXI that is issued for commissions granted by the supplier. The TXI for commissions is automatically issued and attached to the remittance.
Prorate: Enter the prorate amount or percentage.
To issue the remittance, click Generate Remittance Advice.
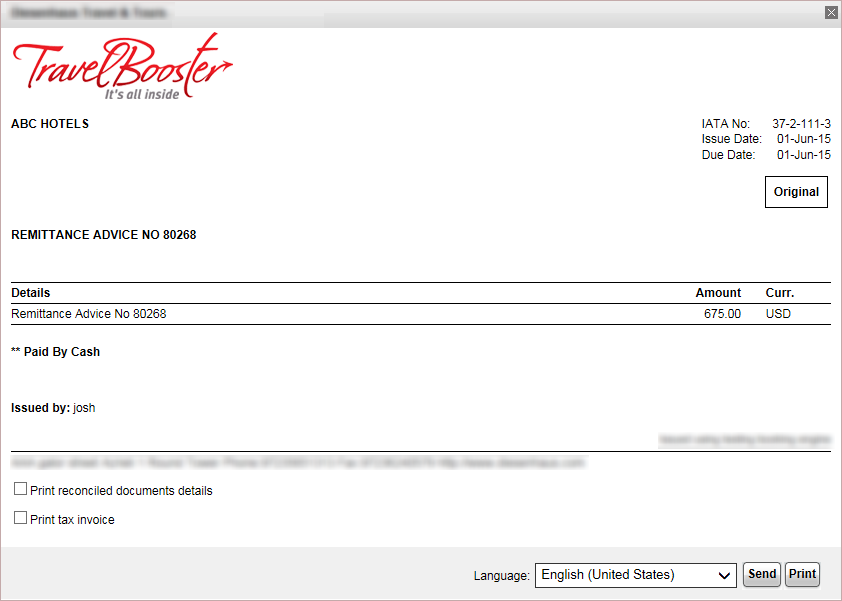
At the bottom of the page you have options for changing the language of the remittance, sending the remittance by e-mail (as an attachment or in the body of the e-mail), and printing the remittance as a PDF file.
If relevant you can select the options Print reconciled document details and Print tax invoice to print these documents along with the remittance. If you select Print reconciled document details, you have two options for printing reconciled documents:
Requisitions (default): Print the payment requisitions covered by the remittance, and any additional documents issued, such as credit notes or tax invoices.
Vouchers: Print the vouchers covered by the remittance, and any additional documents issued, such as credit notes or tax invoices.
The payment requisitions are now covered by a remittance, and are considered reconciled by the system. If you are owed any commissions from the supplier a tax invoice is issued as well. The remittance amount is in red as it has debited the supplier and credited the bank/other account through which payment was made. The payment requisition can not be selected as it is covered by the remittance. Only the remittance can be selected (for example to cancel the document.