To access and perform actions in the module:
Assign the permit Perform actions in Cashier and Update Bank Reference modules
To access and perform actions in the module: Assign the permit Perform actions in Cashier and Update Bank Reference modules |
This module is used, primarily, to deposit receipts for payment made with cash or check. A receipt is deposited in a bank account.
Upon accessing the module, all receipts pending deposit are displayed by default.
On occasion, a receipt can also be withdrawn from the cashier. This is done when petty cash is required or money needs to be returned to the account from which payment was made.
Further to the above, this module is used to perform the following actions:
Go to Financial – Cashier. By default, all receipts pending deposit will be displayed in the results section.
If required, locate the specific receipts for deposit as described below.
Select one or more receipts to deposit by selecting the check box in the first column of the receipt row.
If required, click the Select All link at the bottom of the page to select all the receipts on the page.
|
When selecting receipts to deposit:
|
Click Deposit at the top or bottom of the page.
The Deposit Definitions page is displayed.
|
You can import *.txt and *.bll files generated by your company. For more information on this feature, contact your project manager. |
Go to Financial - Cashier.
Click Import File.
The Import Deposit File dialog box is displayed.
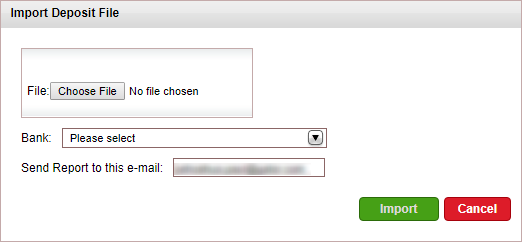
Click the Choose File button, and select the file you want to upload.
In the Bank field, select the bank account to which you want to make the deposit.
In the Send Report to this e-mail field, edit the e-mail address to which a report is sent after the file is imported. By default, this is the e-mail address of the user who logged in.
Click Import.
The system matches the information in the file with the information in the system and deposits each check separately. The check currency needs to match the bank account currency. The check number is saved in the Bank Reference field.
After the checks are deposited, an e-mail message is sent to the address entered in the dialog box listing all the checks the system failed to deposit.
Go to Financial – Cashier. By default, all receipts that can be withdrawn will be displayed in the results section.
If required, locate the specific receipts to withdraw as described below.
Select one or more receipts for withdrawal by selecting the check box in the first column of the receipt row.
If required, click the Select All link at the bottom of the page to select all the receipts on the page.
|
Note the following when selecting receipts for a withdrawal:
|
Click Withdrawal at the top or bottom of the page.
The Withdrawal Definitions page is displayed.
Go to Financial – Cashier. By default, all receipts pending deposit will be displayed in the results section.
Use one or more of the following search parameters:
Field |
Description |
Issue Date |
Select the date range for the issue date of the document (receipt, deposit, withdrawal). To select a specific issue date, select the same date in both the Issue Date and to fields. |
Value Date |
Select the date range for the value date of the document (receipt, deposit, withdrawal). To select a specific value date, select the same date in both the Value Date and to fields. |
Reference |
Enter a range for the document number using only numbers. Do not enter the document prefix. To locate a specific document, enter the same number in both the Reference and to fields. For example: to locate receipt no. 18, enter the number 18 in both fields. |
Form of Payment |
Select the form of payment (Cash, Check, or both). |
User |
Select the user who issued the document from the drop-down list. |
Currency |
Select the currency of the document from the drop-down list. Note that when making a deposit or withdrawal, all relevant documents must be of the same currency. |
Branch |
Select the branch which issued the document from the drop-down list. |
Document Type |
Select Pending for deposit to locate only receipts that have not been deposited. Select All documents to locate all document types (receipt, deposit, withdrawal). A receipt already deposited or withdrawn cannot be selected. Select Items Matching to locate a specific deposit or withdrawal together with its associated receipts. After selecting Items Matching, select either Deposit or Withdrawal and enter the document number. Select Deposit without bank ref to locate deposits missing a bank reference number. |
Click Find.
Documents matching the search criteria are displayed in the results section.
For each document, the following fields will be displayed on this page:
Field |
Description |
Ref. |
The document number, preceded by the document prefix. D indicates deposit. R indicates receipt. W indicates withdrawal. The reference is an active link. Clicking the link will display the document. |
Issue |
The date on which the document was issued. |
Value |
The date on which the document goes into effect. |
Form of Payment |
For only a receipt: this field will indicate whether payment was made by cash or check. Any details entered in the receipt will be displayed after the form of payment. |
Payment By |
For a deposit: the bank in which the receipt was deposited. For a receipt: the account for which the receipt was issued (e.g. travel file number, travel agent). For a withdrawal: the account to which money was transferred from the Cashier. |
Bank Ref. |
The bank reference number |
Dep/WD |
For a deposit: the deposit number. For a receipt: the deposit or withdrawal number covering the receipt. For a withdrawal: the withdrawal number. |
Amount |
The amount of the debit or credit. An amount that debits the Cashier (receipt) is displayed in red. An amount that credits the Cashier (deposit or withdrawal) is displayed in green. |
Curr. |
The currency of the document. |
To cancel a document |
|
|
To cancel a document: Click
the arrow The document will be cancelled and Cancelled will be displayed in the Deposit/Withdrawal field. To cancel a receipt, the user needs the permit Cancel cash payment receipts and/or Cancel credit card, bank transfer and check payment receipts. |
Go to Financial - Cashier.
Search for deposits without bank ref.
Next to each deposit you want to update, arrow
![]() at the end of the document row and select Bank
Reference.
at the end of the document row and select Bank
Reference.
You cannot update deposits that have already been exported from the system through the Export Data to General Ledger module. |
The Edit Bank Reference dialog box appears.
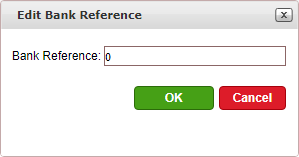
In the Bank Reference number field, enter the bank refence number and click OK.