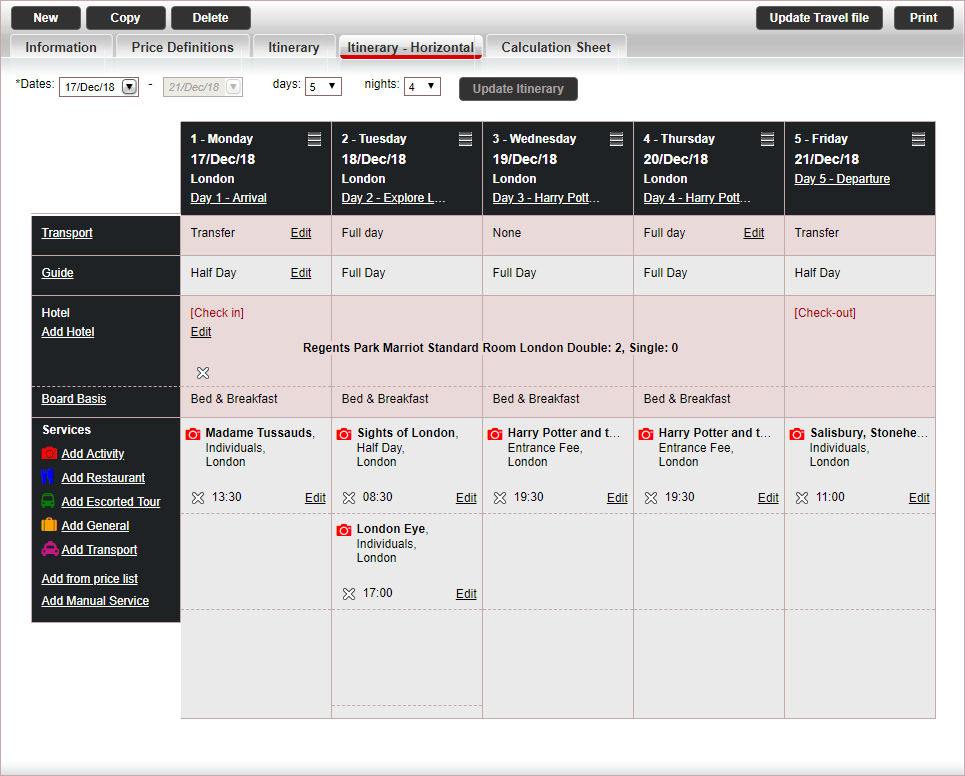
The Itinerary - Horizontal tab is used for managing and planning the tour itinerary using a horizontal itinerary.
You can also use the vertical itinerary, according to your preferences.
With the horizontal itinerary, the first column displays the service types and the rest of the columns are the itinerary days.
There are four rows in the itinerary:
Transport - initialized from the Price Definitions tab
Guide - initialized from the Price Definitions tab
Hotel
Services
The services selected for the itinerary, together with the price definitions, will determine the group and individual costs in the calculation sheet.
The guide and transport price lists are taken from the Price Definitions tab, and can only be changed in that tab.
Itinerary days
Guide and Transport
Hotel
Services
Go to the Itinerary tab.
Define the itinerary date range:
Select the from date and to date of the itinerary date range
Or
Select the from date and the number of days or nights. The to date will be updated automatically.
|
The itinerary date fields - from, to, days, and nights - are interdependent. Updating the value in one of the fields will automatically update the values in the other fields. |
Click Create Itinerary.
The itinerary days, with corresponding dates, will be displayed. In addition, the guide and transport contracts defined in the Price Definitions tab will be added each day of the itinerary.
There are two methods for adding days to an existing itinerary:
Add individual days before or after a single day in the itinerary
Add multiple days to the end of the itinerary
Locate the itinerary day that precedes or follows the new day to be added.
Click the hamburger
menu icon (![]() )
in the row of the day.
)
in the row of the day.
A pop-up menu is displayed.
Click Add day before to add a new day before the selected day. A new day will be added one day before, thereby also changing the itinerary’s start date to one day before. The end date of the itinerary will not be affected. All days and services preceding the selected day will be “pushed” one day back.
|
For example: An itinerary starts on March 1st and ends on March 8th. Selecting Add day before on March 3rd will insert a blank day on March 2nd. The existing itinerary for March 2nd will be pushed back to March 1st. The existing itinerary for March 1st will be pushed back to February 28. February 28th will now be the new start date of the itinerary. |
Click Add day after to add a new day after the selected day. A new day will be added one day after, thereby also changing the itinerary’s end date to one day after. The start date of the itinerary will not be affected. All days and services following the selected day will be “pushed” one day forward (e.g. a hotel accommodation will be extended to an additional day).
|
For example: An itinerary starts on March 1st and ends on March 8th. Selecting Add day after on March 6th will insert a blank day on March 7th. The existing itinerary for March 7th will be pushed forward to March 8th. The existing itinerary for March 8th will be pushed forward to March 9th. March 9th will now be the new end date of the itinerary. |
Click Save.
In the Days or Nights field above the itinerary, select the new number of days or nights to include in the itinerary.
Click Update Itinerary.
The new days or nights are added to the end of the itinerary
Click Save
Click the hamburger menu icon (![]() ) in the row of the day
and select Edit Day
) in the row of the day
and select Edit Day
OR,
Click on the link with the description of the day.

The Edit Day dialog box is displayed.
In the Description field, enter a short title for the day's itinerary.
The Bus field displays the transfer price level for the day selected (for example, Full Day if the group needs a transfer for an entire day).
If required, select a different price level from the drop-down list.
The Guide field displays the guide price level for the day selected.
If required, select a different price level from the drop-down list.
In the Remark field, select the name of the remark to be included in the day's itinerary. A new remark can be added by clicking <New Remark...> at the end of the Remark drop-down list.
|
The remark name or contents is printed in the itinerary when the Remark Name or Remark Contents print parameters are selected before printing. The Remark
Name is the title of the itinerary entry. The Remark Contents is the itinerary
text itself. |
If the day's itinerary includes a hotel accommodation, the Hotel (Board basis) field displays the hotel board basis for the day selected.
If required, select a different board basis from the drop-down list.
Click OK in the dialog box.
Click Save.
Click the hamburger
menu icon (![]() ) in the row of the day and select
Delete entire day.
) in the row of the day and select
Delete entire day.
The following message is displayed:
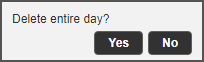
Click Yes to delete.
The entire day, including services, is deleted. A service, whose reservation extends to additional days in the itinerary, will not be deleted from those days.
Click Save.
In the first day column, in the row of the guide or transport services, click the Edit link.
Follow the steps in Add/Edit Calculation Sheet Services
In the first column of the Guide or Transport row, click on the service type link to expand the row.
For each column, there are radio buttons and check-boxes listing the default and additional price levels for the price list.
![]()
To edit the price levels of the entire itinerary, in the first column, select the price level
To edit the price level of an individual day, in the column of the day you want to change, select the price level.
|
If the same price level is selected for all days in the itinerary, a single transaction will be opened for these days. If a different default or additional price level is selected on some of the days:
|
In the hotel row, click the Add Hotel link.
The Add Service dialog window will be displayed.
Enter the search parameters and click Find.
Price lists matching the search criteria are displayed in the results section.
Click the Plus
icon ![]() in the row of the required hotel.
in the row of the required hotel.
The Check-In field is initialized with the first day of the itinerary. If required, select a different check-in date.
If required, update the check-in time.
In the Nts field, select the number of reservation nights
Or
In the Check-Out field, select the end date of the accommodation.
|
The two above-mentioned fields - Nts and Check-Out - are interdependent. Updating the value in one of the fields automatically updates the value in the other field. |
If required, update the check-out time.
In the Board basis field, select the board basis of the hotel.
|
This is the board basis that will apply to the accommodation for the entire reservation period defined above. If required, the board basis can be changed (e.g. from Bed & Breakfast to Half Board) for a specific day in the period using the Edit Day dialog window. |
The Staff in Single and Staff in Double fields are initialized with the information entered in the Information tab. If required, update these fields.
To display the remarks in the price list, click Display price list remarks.
Click Done. If the hotel contract's price list includes a package rate, this rate is used for the calculation sheet.
If additional hotels are required for other days in the itinerary, repeat this procedure.
After adding the hotel accommodation, click Done at the bottom of the dialog window.
In the check-in day, in the Hotel row, click the Edit link.
Follow the steps in Add/Edit Calculation Sheet Services.
In the first column of the Hotel row, click on the Board Basis link to expand the row.
For each column, there are radio buttons listing the price levels for the price list.
To edit the price levels of the entire itinerary, in the first column, select the price level
To edit the price level of an individual day, in the column of the day you want to change, select the price level.
In the check-in day,
in the hotel row, click the Delete icon (![]() ).
).
The following message is displayed:
To delete the hotel, click Yes.
The hotel is deleted from the itinerary.
Click Save.
In the Services row, click on the Add <service type> link of the relevant service type.
Or,
Click the Add from price list link.
The Add Service dialog window is displayed.
Do one of the following:
In the Product Type field, select the required service, and in the Destination field, select the service destination.
In the Name field, type all or part of the name of the service.
If required, define additional search parameters for the service and click Find.
Contracts matching the search criteria will be displayed in the results section.
Click the Plus
icon ![]() in the row of the required service.
in the row of the required service.
Enter the service definitions (such as, date and time).
To display the remarks in the price list, click Display price list remarks.
Click Done.
If the contract's price list includes a package rate, this rate is used for the calculation sheet.
After adding all the services to the itinerary, click Close at the bottom of the dialog window.
In the Services row, click the Add Manual Service link.
Follow the instructions in Operations - Calculation Sheets - Itinerary - Add/Edit Service
Drag the service to the relevant column in the itinerary.
OR,
Click the Edit link, and edit the service dates.
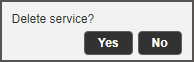
In the Services row, click
the Delete
icon (![]() )
next to the service you want to delete.
)
next to the service you want to delete.
The following message is displayed:
To delete the service, click Yes.
The service is deleted from the itinerary.
Click Save.